
FAQ frequently asked questions & troubleshooting
General Questions
WallacePOS uses some pretty new & clever technology to enable offline processing of sales, refunds & voids.
Offline mode is available to users once they have signed into a device for the first time.
When in offline mode, new transactions and updates get saved into hmtl5 local storage, which is retained when closing the web browser. When the system detects a connection is available, it will attempt to synchronise these records with the server & other POS terminals.
You can take sales & orders in offline mode, as well as processing refunds, voids & updating sales notes for records that are locally available.
WallacePOS also allows you to perform all these actions for sales & orders that are still offline.
Note: For security purposes, admin users must login in online mode before offline functionality becomes available. Locally available records can be adjusted via the admin dashboard, POS settings section.
By storing data offline to be readily available, and by receiving real time updates of that data, WallacePOS is able keep its most used operations lightning fast.
On the terminal side, this means that staff can look up & add items very quickly. In fact, the terminal doesn't use the internet connection at all until the sale is processed.
The transfer of sale data is asynchronous, meaning that you can continue with another sale while the last one is transfering.
Because WallacePOS is based on open-source technologies, there are millions of developers with the skills to extend your WallacePOS system. Please click the link below for more info:
https://wallacepos.com/get
Suggest a good question to us through Github or help by contributing one yourself.
You can allow different staff & managers fine-tuned access to admin dashboard areas:
- Click on Settings -> Staff & Admins & click on the edit icon of the user you want to modify.
- Give the user access to the dashboard by selecting yes in the Access select box. (If you would like to give the user all permissions, select admin instead and click update to finish).
- Tick the checkboxes corresponding to the areas and operations you would like to give the user access to.
You may also select the dashboards that the user has access to.
If you select none, the landing page that the user receives when logging is the first allowed by permissions.
Notes: The admin user permissions cannot be modified. Only admins can see and modify settings, including users, devices & locations.
Device registration is simple, once off process for each device. Once registered your device is remembered with a special ID. Sometimes clearing extended browser cache can delete this ID, requiring the device to be re-registered. You can register multiple web browsers under the same device name, allowing staff members to use their preferred browser.
To register a device:- Browse to and login with your admin credentials. If your not an admin, get one to do this for you.
- You will be presented with a registration dialog. You may select an exiting device/location using the select boxes or create a new one using the provided text field. Once the form is filled, click register to complete the process.
- Users can now login and take sales using this device.
Note: If you would like to Change a devices location after it has been registered, you may do this via the admin dashboard (admins only).
To keep track of past users, devices & location, WallacePOS provides functionality for disabling these items when they are no longer current.
Once disabled, you may delete these items, but it is highly recommended to leave them in the system as past sales records may rely on these values.
WallacePOS will include an archive function in the next release so you can safely archive old data and restore it if necessary.
Note: Managing these items requires you to be an admin user.
Hardware Questions
Browser Printing
Browser printing prints a HTML receipt to one of the operating systems installed printers and is selected by default.
It relies on the browser & printer software to convert the document into a format the printer understands.
Whilst this method is fine for normal ink-jet & laser printers, using it with thermal printers may produce unexpected results.
To get the best result out of thermal printers, use Direct Printing as outlined below.
Direct Printing
WallacePOS is able to directly communicate with thermal receipt printers that support the standard ESC/POS printer language (most have support).
Communicating directly with the printer allows the control of a standard cash draw that is connected through the printer,
as well as advanced printing features such as image printing, feed and cutter control.
Installing the print Applet
To start using direct printing, you must first install WebPrint on your computer or Android.
These applications act as a messenger and provide an interface for WallacePOS to communicate directly with your printer.
- Log into your WallacePOS terminal.
- Click on the settings tab in the top of the terminal, and then click Printing.
- Click on connection to display connection setting and change the Method to "Web Print ESCP".
- After a few seconds, you will be prompted to install the Applet, click OK.
- On Computer, download & run the WebPrint installer when prompted. Once complete WebPrint should open in the system tray.
On Android, you will be redirected to the Play store to install WebPrint.
Once installed, open WebPrint and touch the start server button. - Once the Applet is installed and running, go back to the WallacePOS terminal, refresh the page and log back in.
- You may be prompted by the print applet to allow access to your printers, click Yes/OK.
- Once completed you should see "Print-App Connected" status in the bottom left corner of the terminal.
NOTE: Only Network connection is available on Android devices. USB support is available via an OTG cable but is in beta.
Connecting a printer
USB Connection
- To use a USB thermal printer, you must first add the printer as a RAW device on your computer.
Follow the below guide to setup a RAW printer: - After setting up your printer, go to the WallacePOS terminal, go to settings and Printing. Click connection and change Type to "Raw" (Method should already be set to Web Print).
- Select your printer from the list and click the test button to verify the connection. If you do not see your printer, click the refresh button next to the list.
IP/Network Connection
Printers that have a network connection can be used on both Computers and Android devices.
- Firstly, connect the printer to your network with an ethernet cable. If using Wifi consult your printer manual on how to connect.
- We must then determine the IP address and port number that the printer is using.
Print a configuration page by turning off the printer and tuning it back on WHILE holding down the feed button.
The configuration page should list IP address and port. If not, consult the printer manual on how to obtain these details for your specific printer. - Go to the WallacePOS terminal, Click on the settings tab in the top of the terminal, and then click Printing.
Click connection and change Type to "Raw TCP" (Method should already be set to Web Print). Enter the IP address and port number for your printer. - Test the connection by using the Test or PrintQR button next to the Printer connection settings.
Serial Connection
- From the WallacePOS terminal, Click on the settings tab in the top of the terminal, and then click Printing.
Click connection and change Type to "Serial" (Method should already be set to Web Print). - The most common serial settings are already set, so click the test button and check if the test page prints. If unsuccessful, find your serial settings by printing a configuration page.
Print a configuration page by turning off the printer and tuning it back on WHILE holding down the feed button. - The configuration page should display serial port settings for your printer. Input the settings and click on the test button to verify the connection.
Note: Serial connections may not be fast enough to print high resolution graphics, resulting in horizontal lines in the print. Network or USB connections are recommended.
Direct Printing Formats
Text-Mode
Text mode printing is the default printing format when using direct printing. Apart from the logo and QR code, the receipt is send to the printer as text commands.
It is the most reliable format for legacy printers and uses the printers built-in fonts and character sets of the printer.
Bitmap-Mode
Bitmap mode printing is an advanced printing method that allows template receipts, HTML fonts and unicode character support.
A HTML receipt template is rendered and converted into a bitmap image format supported by most printers. Some browsers may not support this method and serial connected printers may not be fast enough to print this format. We recommend text-mode receipts for serial connected printers.
Creating a thermal receipt logo
The receipt logo is required to be a 1-bit palette (monochrome) image for best print results. A 1-bit image is where each pixel is either black or white. Various image editing programs are capable of converting images to a 1-bit palette. Below are some guides to creating the monochrome version of your logo.
-
GIMP
Download: https://www.gimp.org/downloads/
Guide: https://docs.gimp.org/en/gimp-image-convert-indexed.html -
Photoshop
Guide: https://helpx.adobe.com/photoshop/using/converting-color-modes.html
Template Customization
Various receipt information can be customized via the Admin panel POS settings page.
Browser and bitmap-mode receipts can be further customized by editing the mustache receipt template. You can edit the templates by going to Utilities and clicking on the Template Editor button.
Firstly make sure all connections are secure between the printer and the computer/network. If using a network printer double check that the device is connected to the network.
Secondly, close your web browser (along with WallacePOS), re-open it and log back in. Make sure the "Print-App Connected" status is showing in the bottom right hand corner of WallaecPOS.
Try printing by using the test button in the settings window. If the printer still fails, power off the printer, computer and if using a network printer any network equipment such as routers and switches. Power the devices back on and wait a few minutes before testing the printer.
WallacePOS supports standard POS hardware.
The devices, being standard models, can be purchased cheaply from various places. Printers can be bought for a little as ~$200, whilst cash-draws and scanners go from ~$60 and $~35 accordingly.
Barcode Scanning
Barcode scanning requires a USB barcode scanner (Windows,Mac,Linux). Scanning on Android requires an additional OTG cable with an OTG compatible Android device or a Bluetooth scanner compatible with Android.
Scanner installation usually just requires you to plug the scanner into one of the USB ports on your computer. If you received instructions with the scanner, follow the manufactures directions.
No settings need to be modified in the terminal, you can login and scan items right away.
Receipt Printing
Receipt printing requires an 80mm thermal receipt printer with ESC/POS (Epson standard code for printers) support. If you need 40mm support, please submit an issue through github.
Most thermal printers support ESC/POS but you should check before purchasing. Android devices require a network-connected model (Ethernet or wifi).
Cash Draw
Cash draw just needs to be a standard POS/electronic cash draw. This plugs into the printer using a phone-type plug.
Tyro integrated eftpos allows seemless integration between WPOS and your eftpos terminal to save time and avoid operator mistakes.
To set up integrated Eftpos:- Login to the WPOS terminal and click on the settings tab.
- Under Integrated Eftpos, click on the enabled checkbox and select Tyro from providers.
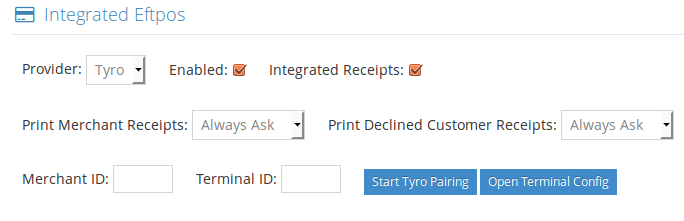
- If you need to, change Eftpos receipt options based on your preferences.
- Enter your merchant and terminal IDs and click on "Start Tyro Pairing". You will be prompted to perform the "Authorise POS" function on your terminal described in the next step.
- From your Tyro device select Menu -> Settings -> Integrated Eftpos -> Authorise POS. Enter your Admin Password and press Ok.
- After successfully Authorising on your tyro terminal, you will receive a "Pairing successful" message in the WPOS terminal. You are now ready to take Eftpos payments.
Note: Due to license limitations, Tyro integration is only available in our hosted or enterprise versions.
To make an integrated Eftpos transaction:- Create a sale as normal and click proceed.
- If the customer is using multiple payment methods, add the additional payments (Not the tyro payment) to the sale before proceeding. The remaining balance will be calculated for you.
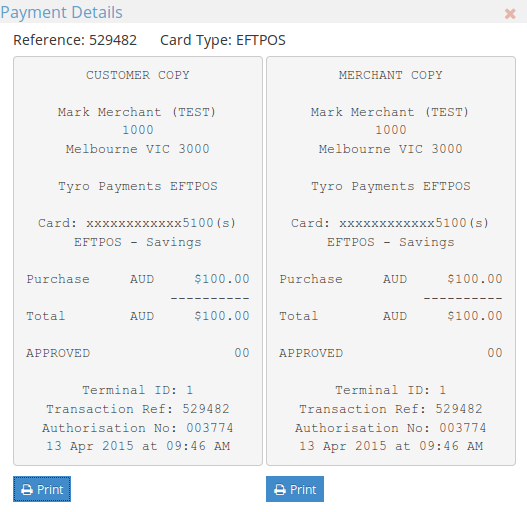
- Click on the green "Tyro Eftpos" button. This will initialize the card payment on the Eftpos machine and show you payment progress through the wpos terminal. Once the customer makes a successful payment, the sale will be automatically processed.
- Depending on your preferences, you will be asked if you would like a merchant receipt printed. If you decline, you can always view and reprint it from the Transaction details dialog.
Note: At this time, WPOS only supports one integrated Eftpos transaction per sale.
Sales Questions
Cash rounding occurs automatically when all payments in the sale are cash and reverted if all cash payments are removed.
Rounding defaults to the closest 5 cents (Aus standard) but you can change it to none or 10cents in POS settings.
If you need this set differently, let us know and we'll modify it to your needs.
Since taxes are calculated on a per item level, cash rounding occurs after tax is calculated and the total tax is not altered by the rounding.
The total rounding for a period is displayed in the tax report, allowing you to alter the tax according to your countries regulations.
Tax is applied on a per item level. This allows items to have different tax applied to each item and support for more complex tax schemes.
Taxes are applied to sale items using Tax rules which can be modified in Accounting Settings.
VAT Tax is currently not supported but we hope to have this functionality in the next version.
WallacePOS order feature is perfect for most cafes & restaurants.
To use the order feature:- Simply fill out a sale in the normal way by adding requested items and clicking the process button.
- Instead of clicking "Complete", click "Add Order". The order is then uploaded to the server and distributed to other POS terminals.
(This is based on you POS record setting) - (Optional) To print an order ticket/receipt, click on the "Recall" button and then "Print".
- To return to the order, click on "Transactions" and find the order in the list. Click on the "Details" button, followed by "Complete".
This will load the order and you will be able to add further items or complete the order with a payment. - To complete the order with a payment, fill out the payment details and click "Complete". Alternatively you can commit new order changes by clicking the "Add Order" button again.
Miscellaneous Questions
Stock tracking is an automatic process that requires little setup and management.
To start tracking stock:- Add the item that you would like to track if it not already present. This is done from Items -> Stored Items on the admin dashboard.
- Go to Items -> Stock in the menu and click the add button in the top right corner of the stock page.
- Select the item you want to track and the location of the first stock, any stock qty and click save.
- The items stock is now tracked at that location and the stock level is automatically deducted as sales take place.
To track more items & locations, repeat the process above.
Once stock is being tracked you may transfer it to different locations, add more stock or set stock levels (stocktake). The transfer feature will also start the tracking process for that receiving location.
WallacePOS provides a few ways to export your data, making it easy to use it the way you want.
CSV format is by far the easiest to work with. It's a human-readable text file that most spreadsheet applications open it. You'll mostly find that you can open CSV with you current software but if not you can download a spreadsheet application by heading to LibreOffice.com (Windows,Mac,Linux) or Google Sheets (Android). Spreadsheet applications are very powerful and easy to use with a little experience. They allow fine-control your data and most have some nice graphing functionality.
WallacePOS also allows you to export your data in SQL database format, using the database backup function in the utilities section. SQL is a widely used format that can we converted and adapted for other systems.
Additionally you may like to use the WallacePOS API to access JSON data. For a list of API endpoints that you can consume, refer here. API documentation will eventually materialise.